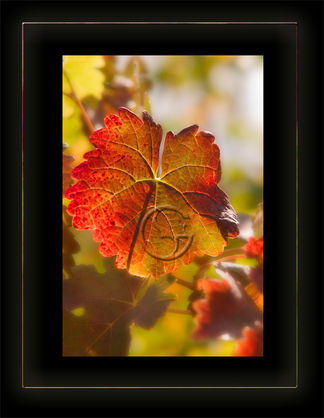
 Focus on Depth of Field Photography Tip for August 2009 If any of you have 'hung around" with photography buffs, you may have heard them refer to Depth of Field (DOF) when composing a photo, but what exactly are they talking about? Well it's really kind of simple in terms of 'what it is', but can be complicated for amateur to understand how professional photographers successfully achieve it. The DOF in a photograph simply put is the range of distance that the subject is acceptably sharp. When you look at a photograph, controlling the DOF is how backgrounds get blurred out of focus allowing the subject to stand out, such as the photo I've shown here. DOF is also responsible for having the blades of grass in the foreground appear in focus as well as the mountains in the distance of your picture. Depth of Field will vary with camera type, focusing distance and aperture, so the best way to achieve your goals consistently is to know how to calculate for the best result. Depth of Field in a photograph gradually changes from sharp to out-of-focus both in front of and in back of the focusing distance. Have you ever taken a photograph of an animal where their eyes were in focus, but their nose was blurry? Or taken a picturesque shot of an outdoor scene and had the foreground sharp but the hills blurry or vice versa? Most likely these were DOF calculation errors. There are four main factors that control your Depth of Field, lens aperture, lens focal length, distance to subject and film/digital sensor size. Since the latter can't be changed and your focal distance to the subject is usually decided by your choice of composition, that leaves us with using your lens aperture as your primary control over DOF. For those of you who love to get into the scientific calculations, believe me those exist so go forth and do your research to learn more!
Keys to remember: BIG Aperture = SMALL F/Stop Number = Narrow Depth of Field LARGE Aperture = BIG F/Stop Number = Wide DOF Here are some Tips: 1) Bringing attention to your subject by blurring the background means that you want to shoot using Aperture Control and f/stops between f/2.8, f/4 or f/5.6, this is referred to as 'selective focus'. To bring those grasses in the foreground into focus along with the mountains in the background, shoot with f/16 or f/22. 2) You will want to focus about one-third of the way into the scene because Depth of Field extends further behind your subject than in front, so keep this in mind when determining your point of focus. 3) For those of you using an SLR, you have the benefit of knowing that when you look through the view finder you are seeing the world through the lens of the camera. Most digital SLR cameras have a nice feature called Depth of Field Preview. This allows you to set your aperture and see the true DOF by pressing the preview button (look in your manual to see if you have one and where it is located). The preview will always be dark or dim, but you should still be able to preview. 4) Focal length is a factor of which you should be aware. For example a 200mm lens has a narrower DOF than 35mm focal length lens. So, to achieve the DOF you are after, sometimes it's possible to adjust your focal length by changing your distance to the subject resulting in better depth of field. 5) When stopping down the lens (higher f/stop number), you are letting in less light to the camera, so you'll need to compensate to get the correct exposure. Either you'll need to use a longer shutter speed or a higher ISO. The latter is rarely my choice because of the increased noise which is not an acceptable trade off for me. Digital cameras by the way, have been made to emulate the film-based versions quite well when it comes to noise artifacts. So use a tripod whenever possible under these conditions. With these basics in mind, as always I am a firm believer of bonding with your camera so that you will know exactly how it will respond to changes you make when out taking pictures. I encourage you to pick a subject outside your home, something that will stay in the same place so you can run test shots, view them on your computer, and then go back out to be sure you can get the same results twice. Choose a mailbox, fountain, or gnome; something like that. Now set your camera to Aperture Priority Mode. Photograph your gnome many times, each time altering the aperture, point of focus and focal length. Be sure to do this when you have time and LOG your shots. Be sure to mark the distance from your gnome so you can repeat the process and understand the point of focus when compared to the f/stop and focal length. If you take the time to do this exercise, you will be able to get consistent results on the fly! Good Shooting May the Focus Be With You!
0 Comments
Your comment will be posted after it is approved.
Leave a Reply. |
Resources
Here we archive our Photo Tips, Tutorials, Marketing Tips and Preset Downloads from all our sites. ENJOY! Categories
All
My favorite
|


|
|

Commercial License Holder
|

Salon of Art
on Red bubble